Scheduled tasks
FastStats (Enterprise) gives you the ability to schedule a number of defined tasks based upon certain actions or on a regular/ad hoc basis. These actions can be used as alerts to keep you informed when various activities have been completed or certain figures have been reached or not.
.png)
-
From the Tools menu select the option Manage Scheduled Tasks...
The window that is displayed will show, by default, the last 10 scheduled tasks. The detail of each task can be examined by clicking on the Edit button or removed by clicking on the Delete button.
-
Click on the Add Task... button to create a new scheduled task
The predefined tasks that can be scheduled are described below.
Email
An email may be sent based upon a specific condition being met for a given selection e.g. notification that figures for that month are less than projected.
- Open a new scheduled task as described above
- From the Task tab select Email from the drop down box
- Click on the Modify Email... button
- Enter the email addresses of the recipients and the message you want to send
- Click OK
- Click on the Notes tab and enter any information you want to record against this task
- Click on the Schedule tab and complete as necessary—see Schedule settings
- Click OK
Export
A file can be scheduled for export with appended dates to the filename, optionally uploaded to an FTP site and/or with an email message being sent.
- Open a new scheduled task as described above
-
From the Task tab select Export from the drop down box
The display items are as follows:
Function Description File to Export Use the Browse button to navigate to the file you wish to export Output File Use the Browse button to navigate to where the output file should be placed Append Date To Output Filename Use the drop down options to append the Run Date or System Build Date to the filename Date Format Use the drop down to select one of the predefined date/datetime format options to use in the filename or, alternatively, select to user define and enter the required format. For user-defined date formatting options see User-defined appended date formatting Zip Output File Tick this box if you wish to zip up the output file Encryption Password Enter an optional encryption password if you have ticked the zip output file box Email Output Options Use the drop down options to decide if you want to send an email message or an email message with the output file attached. Click on the Modify Email... button to enter the email addresses of the recipients and the message you want to send Upload to FTP server Tick this box and enter the URL of the FTP server you want to transfer the output file to -
Click on the Notes tab and enter any information you want to record against this task
- Click on the Schedule tab and complete as necessary—see Schedule settings
- Click OK
Output promotion
A Cascade Promotion can be setup as a Scheduled Task. An optional email can be sent to interested parties as notification that the Promotion has run.
- Open a new scheduled task as described above
-
From the Task tab select Output Promotion from the drop down box
Note
You can also reach this step by clicking Schedule this Promotion within the Schedule Properties area of the Promotion you are creating in Cascade.
-
Click on the Select... button to navigate to the Promotion you want to schedule (this will already be populated if you arrived at this step via Cascade)
- If you want to send email notifications when the Promotion is output, tick the Email Results To These Addresses tick box
- Click on the Modify... button to enter the email addresses and message you want to send
- Click on the Notes tab and enter any information you want to record against this task
- Click on the Schedule tab and complete as necessary—see Schedule settings
- Click OK
Rebuild item
A file item can be scheduled to be rebuilt with appended dates to the filename, optionally uploaded to an FTP site and/or with an email message being sent.
- Open a new scheduled task as described above
-
From the Task tab select Rebuild Item from the drop down box
The display items are as follows:
Function Description File to Rebuild Use the Browse button to navigate to the file you wish to rebuild Output File Use the Browse button to navigate to where the output file should be placed Append Date To Output Filename Use the drop down options to append the Run Date or System Build Date to the filename Date Format Use the drop down to select one of the predefined date/datetime format options to use in the filename or, alternatively, select to user define and enter the required format. For user-defined date formatting options see User-defined appended date formatting Zip Output File Tick this box if you wish to zip up the output file Encryption Password Enter an optional encryption password if you have ticked the zip output file box Email Output Options Use the drop down options to decide if you want to send an email message or an email message with the output file attached. Click on the Modify Email... button to enter the email addresses of the recipients and the message you want to send Upload to FTP server Tick this box and enter the URL of the FTP server you want to transfer the output file to -
Click on the Notes tab and enter any information you want to record against this task
- Click on the Schedule tab and complete as necessary—see Schedule settings
- Click OK
Rebuild report
A Report file can be scheduled to be rebuilt with appended dates to the filename, optionally uploaded to an FTP site and/or with an email message being sent.
- Open a new scheduled task as described above
-
From the Task tab select Rebuild Report from the drop down box
The display items are as follows:
Function Description Report File Use the Browse button to navigate to the file you wish to rebuild Output File Use the Browse button to navigate to where the output file should be placed Append Date To Output Filename Use the drop down options to append the Run Date or System Build Date to the filename Date Format Use the drop down to select one of the predefined date/datetime format options to use in the filename or, alternatively, select to user define and enter the required format. For user-defined date formatting options see User-defined appended date formatting Zip Output File Tick this box if you wish to zip up the output file Encryption Password Enter an optional encryption password if you have ticked the zip output file box Email Output Options Use the drop down options to decide if you want to send an email message or an email message with the output file attached. Click on the Modify Email... button to enter the email addresses of the recipients and the message you want to send Upload to FTP server Tick this box and enter the URL of the FTP server you want to transfer the output file to -
Click on the Notes tab and enter any information you want to record against this task
- Click on the Schedule tab and complete as necessary—see Schedule settings
- Click OK
Report distribution
You can schedule the distribution of a scheduled PeopleStage report, optionally appending the date to the filename, and with or without an accompanying email message.
- Open a new scheduled task as described above
-
From the Task tab select Report Distribution from the drop down box
The display items are as follows:
Function Description Report Collection Use the drop down to select the required report. Output File Use the Browse button to navigate to where the output file should be placed. Append Date To Output Filename Use the drop down options to append the Run Date or System Build Date to the filename. Date Format Use the drop down to select one of the predefined date/datetime format options to use in the filename or, alternatively, select to user define and enter the required format. For user-defined date formatting options see User-defined appended date formatting Zip Output File Tick this box if you wish to zip up the output file. Encryption Password Enter an optional encryption password if you have ticked the zip output file box. Email Output Options Use the drop down options to decide if you want to send an email message or an email message with the output file attached. Click on the Modify Email... button to enter the email addresses of the recipients and the message you want to send. Send Email To Task Owner On Error Optionally select to send an email notification to the task owner if an error occurs. Click on the Additional Emails button to add further recipients. 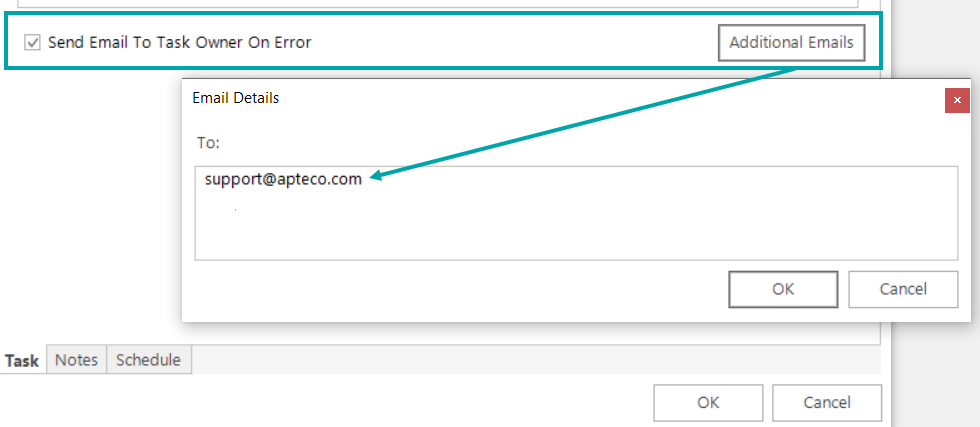
Upload to FTP server Tick this box and enter the URL of the FTP server to which you want to transfer the output file. -
Click on the Notes tab and enter any information you want to record against this task
- Click on the Schedule tab and complete as necessary—see Schedule settings
- Click OK
Update Excelsior
An Excelsior file can be scheduled to be updated with appended dates to the filename, optionally uploaded to an FTP site and/or with an email message being sent.
- Open a new scheduled task as described above
-
From the Task tab select Update Excelsior from the drop down box
The display items are as follows:
Function Description Excelsior File Use the Browse button to navigate to the file you wish to update Publish File Tick this box and use the Browse button to navigate to where you want to Publish this updated file Abort Update After Enter the time in hours, minutes and seconds after which to abandon the update process Append Date To Output Filename Use the drop down options to append the Run Date or System Build Date to the filename Date Format Use the drop down to select one of the predefined date/datetime format options to use in the filename or, alternatively, select to user define and enter the required format. For user-defined date formatting options see User-defined appended date formatting Zip Output File Tick this box if you wish to zip up the output file Encryption Password Enter an optional encryption password if you have ticked the zip output file box Email Output Options Use the drop down options to decide if you want to send an email message or an email message with the output file attached. Click on the Modify Email... button to enter the email addresses of the recipients and the message you want to send Upload to FTP server Tick this box and enter the URL of the FTP server you want to transfer the output file to -
Click on the Notes tab and enter any information you want to record against this task
- Click on the Schedule tab and complete as necessary—see Schedule settings
- Click OK
Update response variable
A Response Variable can be scheduled to be updated from data supplied by a media broadcaster as a result of an email or SMS promotion.
- Open a new scheduled task as described above
- From the Task tab select Update Response Variable from the drop down box
- Enter the name of the email/SMS message in the Message Name box
- Use the Select... button to locate the email/SMS variable used for the broadcast
- Enter the description of the variable you want to create or use the Select... button to locate the existing variable you wish to overwrite
- Click on the Notes tab and enter any information you want to record against this task
- Click on the Schedule tab and complete as necessary—see Schedule settings
- Click OK
Update virtual variable
You can schedule a specific Virtual Variable to be updated.
- Open a new scheduled task as described above.
- From the Task tab select Update Virtual Variable from the drop down box.
- Use the Select... button to locate and select the variable to refresh.
- Optionally select to Restore Variable (ignore any final delete action) - this ensures that the virtual variable is visible and available in its relevant System folder to select from after update.
-
Optionally leave the Send Email To Task Owner On Error checkbox selected. You can also click and enter Additional Emails for others to be notified on error, if you wish.
-
Click on the Notes tab and enter any information you want to record against this task.
- Click on the Schedule tab and complete as necessary—see Schedule settings
- Click OK.
Schedule settings
The Schedule tab controls when the task should be performed, be it conditional on meeting certain selection requirements or after an event. The date and time can be set to run the task on an ad hoc or recurring basis.
The Date/Time options are as follows:
| Option | Description |
|---|---|
| By Minute/Hour | This option allows you to schedule the task to run every x minutes or hours with the option to set a date/time from/to |
| Daily | This option allows you to schedule the task to run every x days with the option to include/exclude weekdays or weekends, as well as to set a from/to date and a time to run |
| Weekly | This option allows you to schedule the task to run every x weeks with the option to include/exclude certain days of the week, as well as to set a from/to date and a time to run |
| Monthly | This option allows you to schedule the task to run every x months or on a specific date/day of the month, as well as to set a from/to date and a time to run |
| Yearly | This option allows you to schedule the task to run every x years or on a specific month/day of the year, as well as to set a from/to date and a time to run |
| Single Instance | This option allows you to schedule the task to run as a 'one off' on a particular date and time |
| On An Event | This option allows you to schedule the task to run x amount of time after a System Update, System Started or Virtual Variables Updated event |
In addition to the date/time scheduling, you have the option to first conditionally test a selection e.g. export a file only if a selection has passed a count threshold, or send an email if the selection transaction costs are below projected forecasts.
- Tick the box Only run task if specified condition is met for given selection
- Use the Browse... button to navigate to the selection file you want to use
- You could now use the Value is: line to say, test the file has Greater than 1,000 records
- Alternatively, by clicking on the radio button below, you could use one of the statistics in the drop down list against a numeric/currency variable accessed by the Select... button e.g. the Sum Cost of the transactions of the people in the selection is Greater than 1,000
User-defined appended date formatting
When managing scheduled tasks, it is possible to append a run or system build date to your file output name. The user-defined option provides greater flexibility and the ability to format this date to best suit your specific requirements.
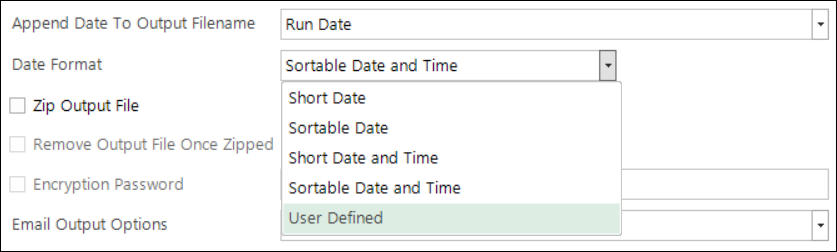
Selecting User Defined allows you to access and specify the date or datetime formatting you want to apply to the appended date in the filename.

There are a large number of ways in which this date or date time can be formatted. A subset of the most useful ones are shown below in the list. All of the characters below will return back a value based on the date property. All other characters will be left intact in the string.
| Format specifier | Description |
|---|---|
| "d" | Day of month from 1 to 31 |
| "dd" | Day of month from 01 to 31 |
| "ddd" | Abbreviated name of the day of the week |
| "dddd" | Full name of the day of the week |
| "M" | The month from 1 to 12 |
| "MM" | The month from 01 to 12 |
| "MMM" | Abbreviated name of the month |
| "MMMM" | Full name of the month |
| "h" | The hour using a 12-hour clock from 1 to 12 |
| "hh" | The hour using a 12-hour clock from 01 to 12 |
| "H" | The hour using a 24-hour clock from 1 to 24 |
| "HH" | The hour using a 24-hour clock from 01 to 24 |
| "m" | The minute from 0 to 59 |
| "mm" | The minute from 00 to 59 |
| "s" | The second from 0 to 59 |
| "ss" | The second from 00 to 59 |
Note
Any characters that are not included in the full list, as found in the link below, can then be used in the box, but all characters that are not allowed in valid file names will be removed. These include the following characters (* ? / : | ").
For more details and extra formats that aren't included above, you can see the following page: Custom date and time format strings - .NET | Microsoft Learn