Software update guides
The following guides cover updating each component of the Apteco software suite. Follow them in the order listed for a full system update.
FastStats Configurator
To install the latest FastStats Configuration utility on your FastStats Server(s):
Note
Depending on your server configuration, this may be two or more installations.
- Use Add or remove programs to uninstall the FastStats Configurator.
- Open the WebService.zip file and browse to the WebService\Configuration Utility folder.
- Run the FastStats Configuration x64 Setup.msi file.
To confirm the update on each machine:
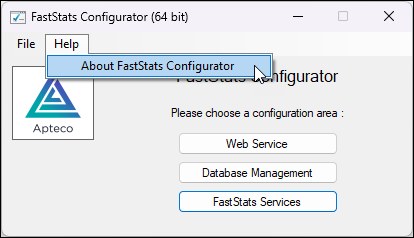
- Launch the FastStats Configurator.
-
Check the version information returned from Help > About.
Note
For 32-bit machines, use FastStats Configuration Setup Setup.msi. If you have a 64-bit operating system, you should not use the 32-bit installer.
FastStats Designer
Install or update FastStats Designer on the machines you use to build FastStats databases.
To install FastStats Designer, run the FastStats Designer x64 Setup.msi from the Designer.zip folder.
Note
The installer automatically uninstalls any previous version so there is no need to uninstall FastStats Designer before updating.
Note
If you see a 'no valid licence found' error after installation, uninstall FastStats Designer, delete the C:\Program Files\Apteco\FastStats Designer\FastStats Designer.exe.config file, and reinstall.
Info
If you have multiple Apteco software applications installed on the machine, it is quicker and easier to uninstall each of them at this point. If you do this, please ignore any subsequent 'uninstall' steps.
Note
FastStats Designer x64 Setup.msi is a 64-bit installer. The 32-bit installer is available on demand from Apteco.
FastStats system SQL databases
Note
The Q2 2024 release upgrade process creates additional SQL Server Logins to ensure consistency between single and multiple database configurations. Creating these logins requires 'sysadmin' permission when running these update scripts for the first time.
To update any FastStats system SQL databases:
- Launch the FastStats Configurator running on the FastStats Server, then click Database Management.
-
Select the Database Update Wizard, then click Start Wizard.
The Update Database Wizard opens.
-
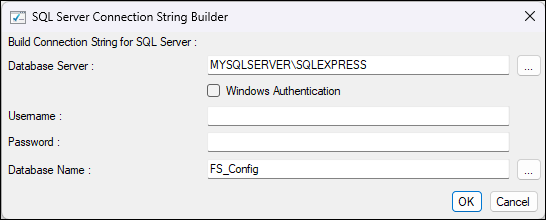
Click Edit and define a connection string to connect to your Configuration database (usually named 'FS_Config').
Note
If you are using a SQL Server Express edition, you probably need
\SQLEXPRESSon the SQL Server name. The defaultfaststats_serviceaccount typically used for the FastStats Service and FastStats Web Service is not sufficient for this, as the script includes system-level changes (e.g. to alter database recovery settings).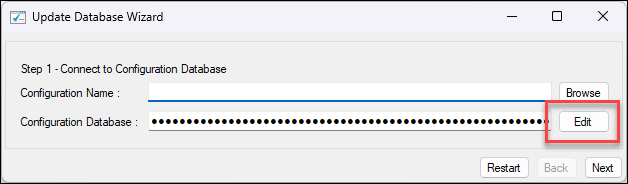
-
Click Browse.
-
Highlight the configuration you wish to update, then click OK.
This returns you to the Update Database Wizard.
-
Click Next.
-
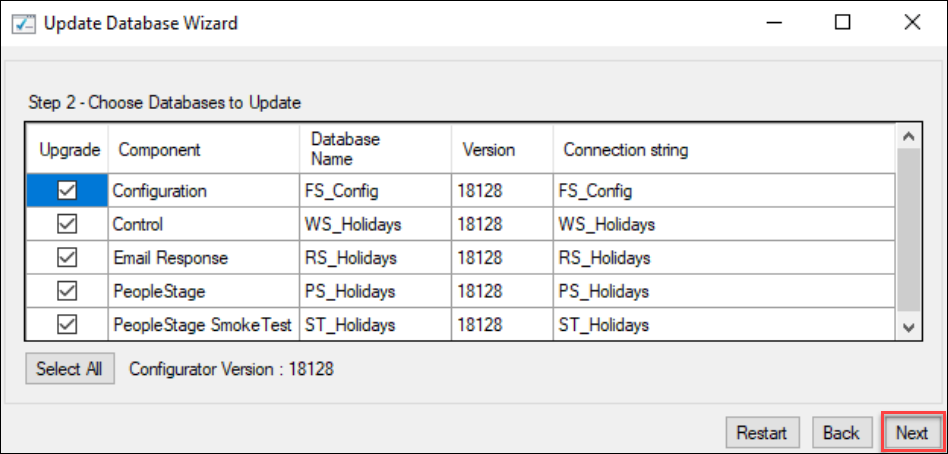
Select the database(s) to update, then click Next.
-
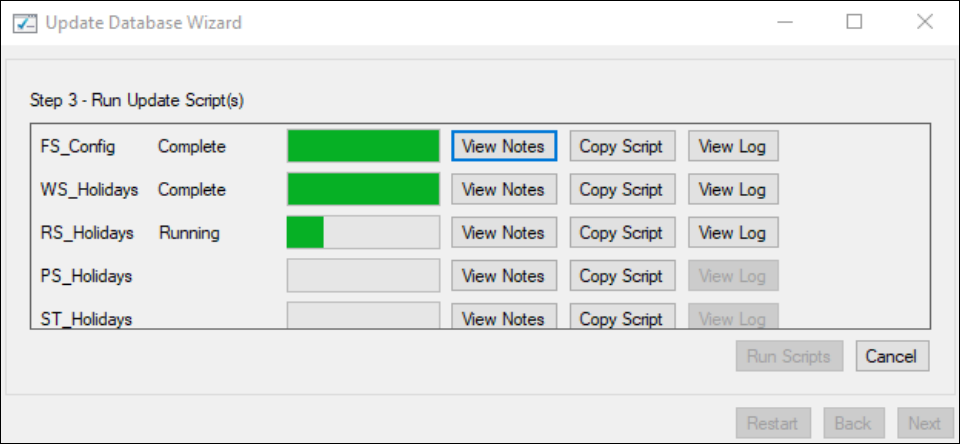
Click Run Scripts.
Note
Clicking View Notes gives you the ability to copy the script to view its contents. Each Update Database script is then run, with a progress bar showing completion status. A View Log button becomes available for each script as it is run.
-
If errors have occurred, this is reported in the same column as 'Complete' and 'Running'.
Warning
Use the Restart button to restart the wizard for each configuration you have defined in your configuration database.
-
Click Finish when you have updated each configuration defined in the configuration database.
Web Service
Before you begin, make a note of the website that the FastStats Web Service is currently installed in.
To install the latest Web Service:
- Use Add or remove programs to uninstall the FastStats Web Service.
- Run the Setup.exe Web Service installer from the WebService\WebServer\Web Service Installer folder.
-
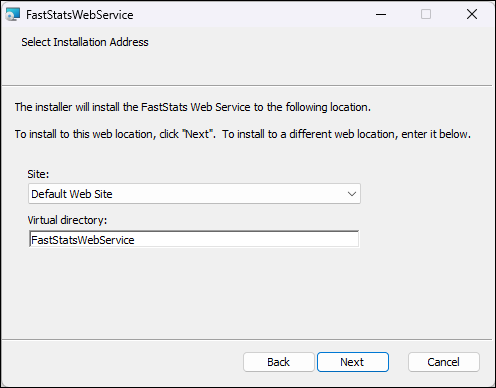
Choose the website to install to, together with the name of the virtual directory to create.
-
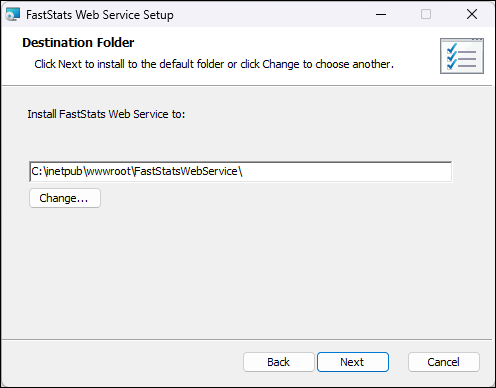
Choose the physical directory to install the FastStats Web Service into.
-
Click Next and then Install.
Note
Since the Q3 2015 release, the FastStats Web Service installer automatically creates a 'FastStats App Pool' Application Pool to run the FastStats Web Service. If you wish to run the FastStats Web Service using a different application pool, adjust this manually afterwards.
FastStats Service
Use the FastStats Configurator to update the FastStats Service on each of your FastStats Server machines.
Note
The FastStats Service is shipped within and fully managed by the FastStats Configurator.
To update the FastStats Service:
- Open the FastStats Configurator, then click FastStats Services.
-
Highlight each service (either individually or use shift-click to select them all), then click Update.
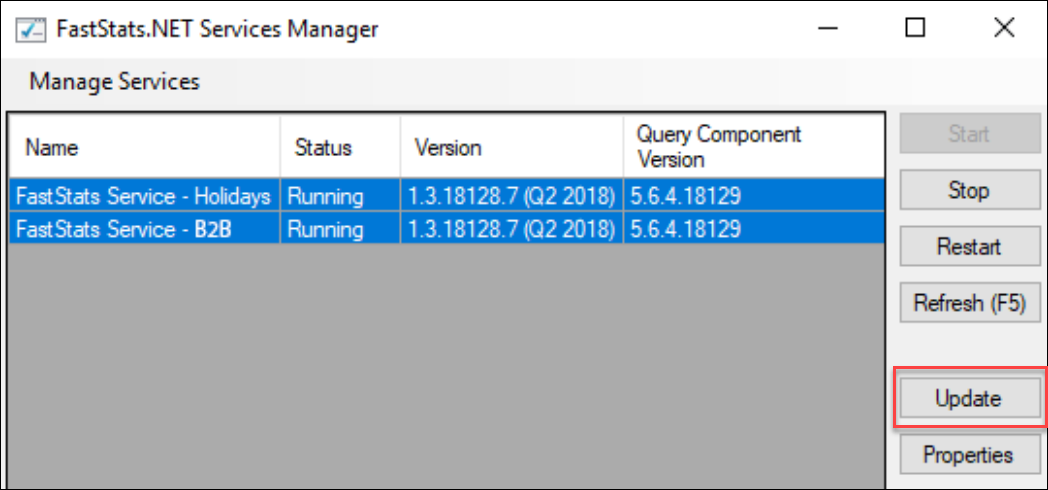
This process installs the new FastStats Service program files into each registered instance of the FastStats Service.
Note
In future releases you will be able to use Choose Version to determine which version of the service to install. The FastStats Configurator currently only contains one version of the FastStats Service.
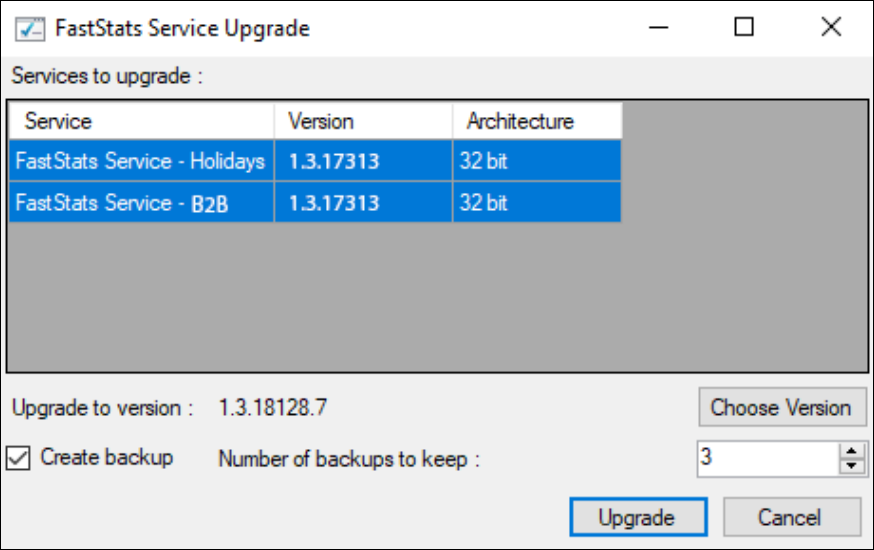
Notice that the above dialogue shows both the current version of each FastStats Service, together with the version that it can be upgraded to.
-
Click Upgrade. You should see a message showing the services that upgraded.
If necessary, use the FastStats Configurator to review your FastStats Service configuration.
Apteco FastStats
Note
Although Apteco FastStats may be installed locally on each user's machine, it is more typically delivered through the 'Apteco Launcher' mechanism from the web server. The latter is the preferred method as you can simply update the server rather than uninstall and reinstall on each user's PC.
The FastStats Launcher requires .NET Framework 4.6.2 or later and supports TLS 1.3 and later. The mechanism to deliver executable 'binaries' from the server has changed—these binary files are now held in a new Configuration database, allowing easier updates and greater flexibility.
FastStats local
To update a local Apteco FastStats copy:
- Use Add or remove programs on the client machine to uninstall FastStats Discoverer.
-
Run FastStats64Setup.msi from the FastStatsLocal folder.
Note
FastStats64Setup.msi is a 64-bit installer. The 32-bit installer is available on demand from Apteco.
-
Repeat the above two steps for each Discoverer Local user's machine.
FastStats web server launcher
To update Apteco FastStats delivered through the Apteco Launcher mechanism:
- Open the FastStats Configurator on the Application server. This avoids having to install the application on the Web Server.
-
Click Web Service and either:
- Enter a valid connection string to your FastStats Configuration database.
- Click Edit to create one.
-
Click OK.
-
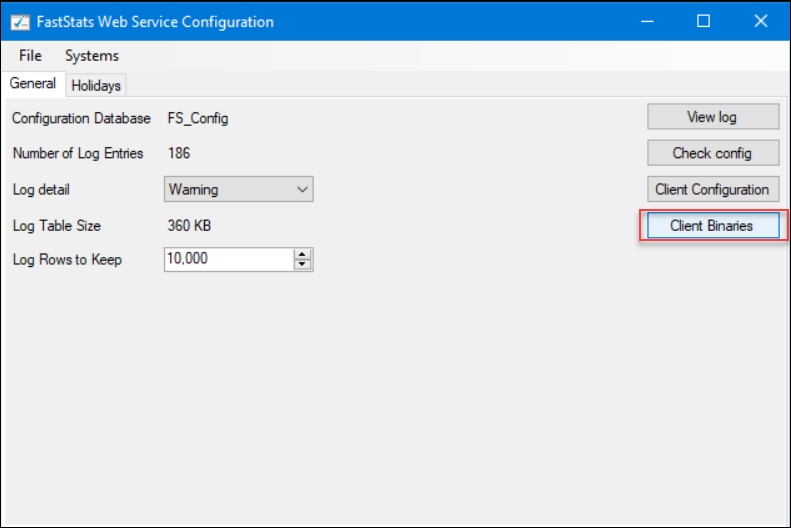
Click Client Binaries.
-
Highlight the Binaries configuration you wish to update, then click Update.
-
Highlight which package to update the Binaries with, then click OK.
Note
The version of the FastStats Discoverer software shipped within the FastStats Configurator is shown on the Choose Package dialogue.
-
When all the binaries are updated, click OK. You can now close all FastStats Configurator windows.
Apteco PeopleStage
Note
Although Apteco PeopleStage may be installed locally on each user's machine, it is more typically delivered through the 'Apteco PeopleStage Launcher' mechanism from the web server. The latter is the preferred method as you can simply update the server rather than uninstall and reinstall on each user's PC.
The mechanism to deliver PeopleStage executable 'binaries' from the server has changed to match FastStats. These binary files are now held in a new Configuration database, allowing easier updates and greater flexibility.
PeopleStage local
To update a local PeopleStage copy:
- Use Add or remove programs on the client machine to uninstall Apteco PeopleStage.
-
Run PeopleStage64Setup.msi from the PeopleStageLocal folder.
Note
PeopleStage64Setup.msi is a 64-bit installer. The 32-bit installer is available on demand from Apteco.
-
Repeat the above two steps for each PeopleStage Local user's machine.
PeopleStage web server launcher
To update Apteco PeopleStage delivered through the Apteco Launcher mechanism:
- Open the FastStats Configurator on the Application server. This avoids having to install the application on the Web Server.
-
Click Web Service and either:
- Enter a valid connection string to your FastStats Configuration database.
- Click Edit to create one.
-
Click OK.
-
Click Client Binaries.
-
Highlight the Binaries configuration you wish to update, then click Update.
-
Highlight which package to update the Binaries with, then click OK.
Note
The version of the PeopleStage software shipped within the FastStats Configurator is shown on the Choose Package dialogue.
-
When all the binaries are updated, click OK. You can now close all FastStats Configurator windows.
Plugins
Online mapping
If you use the online mapping module, use the following steps to apply the shape files to the binaries:
- Create a zip file containing all the shape files.
- Use Add to apply the zip file as a package.
- Choose binaries\maps as the location.
For more details, see the Online mapping installation guide.
Storyboard
Typically, you enable the Storyboard plugin by using the FastStats Configurator on your server to change the Client Configuration. This configuration is read by the FastStats Launcher when it is used to start FastStats.
To enable Storyboard:
- Open the FastStats Configurator and click Web Service.
- Click OK to confirm the connection string for your FastStats Configuration database. The connection string is normally already in place but masked. You can click in the connection string to see it or click Edit to change it.
-
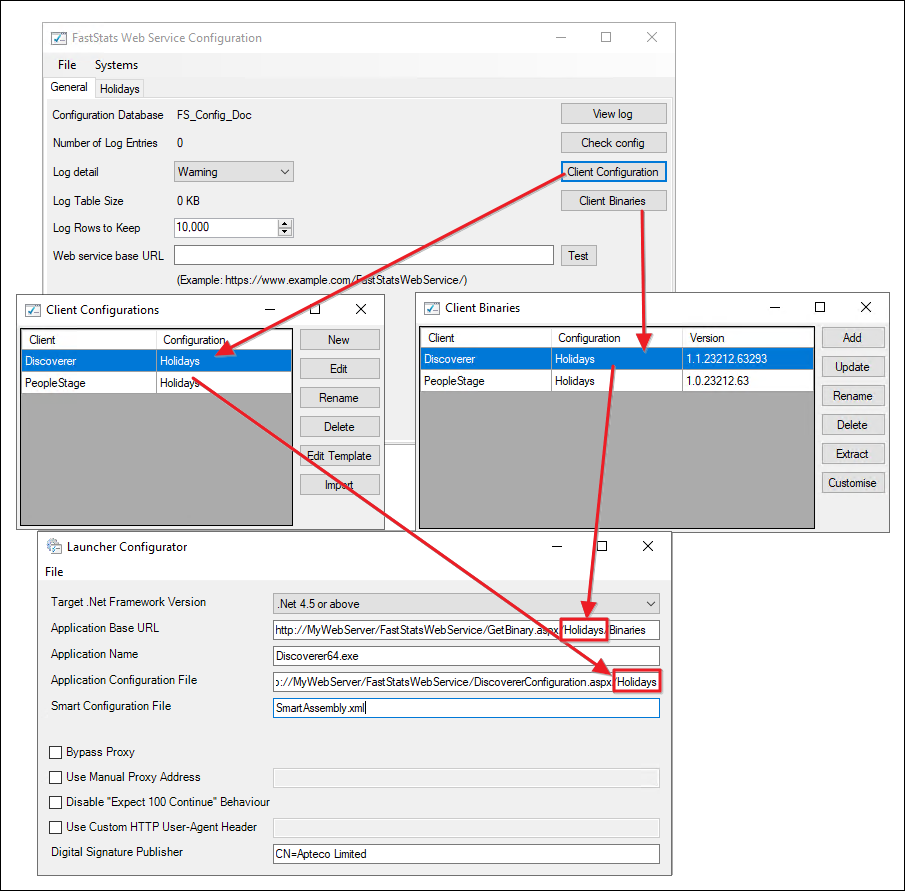
Click Client Configuration.
-
Select your Discoverer configuration and click Edit.
Note
The client name for Apteco FastStats is Discoverer.
-
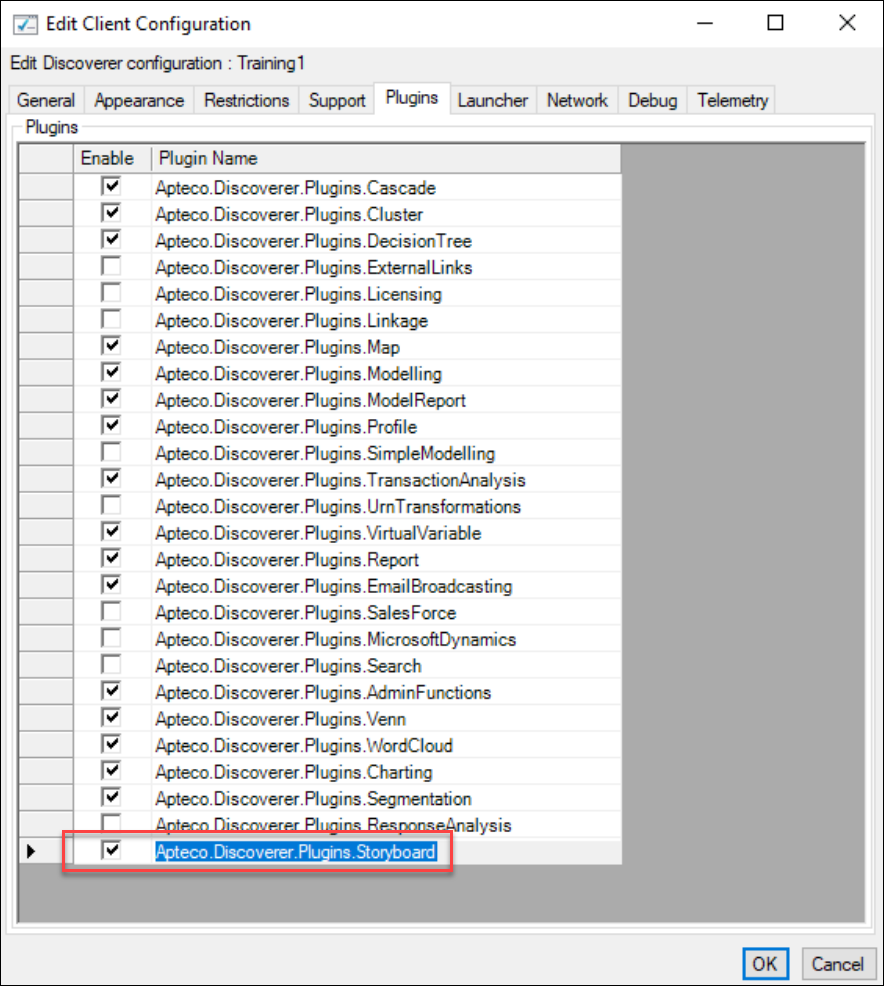
Select the Storyboard checkbox on the Plugins tab to enable Storyboards in FastStats.
-
Click OK and close each of the windows in turn.
If you are not using the normal FastStats Launcher, to enable Storyboard on FastStats Discoverer Local Edition, use the DiscovererConfigurator.exe application installed in the same folder as FastStats Discoverer.
Note
There is no Start menu icon for this configuration application. Navigate to the folder using File Explorer and double-click DiscovererConfigurator.exe to run it.
To enable Storyboard in FastStats Local:
- Choose File > Open and navigate to open the Discoverer64.exe.config (64-bit) or Discoverer.exe.config (32-bit) configuration file.
- Select the Storyboard checkbox on the Plugins tab.
FastStats Excelsior
FastStats Excelsior is installed locally on each user's machine.
To update FastStats Excelsior:
- Use Add or remove programs on the client machine to uninstall Excelsior.
-
Run Excelsior64Setup.msi from the Excelsior folder.
Note
Excelsior64Setup.msi is a 64-bit installer. The 32-bit installer is available on demand from Apteco.
-
Repeat the above two steps for each Excelsior user's machine.
FastStats Email Response Gatherer
To update the FastStats Email Response Gatherer utility (FERG):
- Use Add or remove programs on the server that runs the FERG utility to uninstall the FERG.
-
Run EmailResponseGatherer64Setup.msi from the DigitalIntegration folder.
Note
EmailResponseGatherer64Setup.msi is a 64-bit installer. The 32-bit installer is available on demand from Apteco.
If you are running more than one instance of the FERG, copy the contents of the installation directory—except the EmailResponseGatherer…exe.config file—to any custom installations of the Email Response Gatherer.
The Email Response Gatherer is typically installed in either:
C:\Program Files (x86)\Apteco\FastStats Email Response GathererC:\Program Files\Apteco\FastStats Email Response Gathererx64
If you are unsure of the above process, please contact Apteco Support.