Optimizely
Integration type: Pre-defined
Documentation
This guide details the processes required to integrate Apteco FastStats and PeopleStage with Optimizely.
Integration options
- FastStats—for a one-off broadcast, use a combination of the Email Broadcasting and Email Responses wizards to upload your list, schedule a broadcast campaign, and receive responses back into your FastStats system.
- PeopleStage—automate data uploads for unattended and scheduled marketing broadcasts.
- Export and upload a file—access generic FTP support to allow data export and upload.
Note
Apteco approves this integration with Optimizely. Use of Apteco software in combination with Optimizely software through this integration will not affect the intellectual property rights indemnity provided in the Apteco software "End User Licence Agreement".
Optimizely integrates with your FastStats system by utilising a RESTful transport over HTTP/S, in conjunction with SFTP.
Before you begin
Warning
This guide assumes you have the relevant Apteco software system administration experience, particularly with the FastStats Administrator, SQL Server, and the areas of the Apteco software that relate to creating selections and campaign creation. You need the appropriate system and SQL Server administrator permissions. You will also need access to the Optimizely web-based control panel.
Useful to have before you start:
- Database Connection String made up of the database server instance name and FastStats system name, for example:
;Initial Catalog=RS_;User Id=faststats_service;Password=fa5t5tat5; - The Digital Integration.zip available from apteco.com/portal/software-releases
- Decide where your FERG folders are to be created (bulk insert folder must be accessible from SQL Server)
- Virtual variables in FastStats to map to broadcast fields
- The Optimizely UI URL, Username, Password, and PIN
- The Optimizely List Name and Message Name (available from the Optimizely UI)
- The Optimizely API Username, Password, and Client ID
Note
You will need to configure an Optimizely Smart Campaign and a Message. The Classic Mailings feature has been deprecated—see Optimizely's help on migrating a Classic mailing: webhelp.optimizely.com
Process summary
The following diagrams describe a typical process from FastStats to Optimizely, to the customer, and back to FastStats.
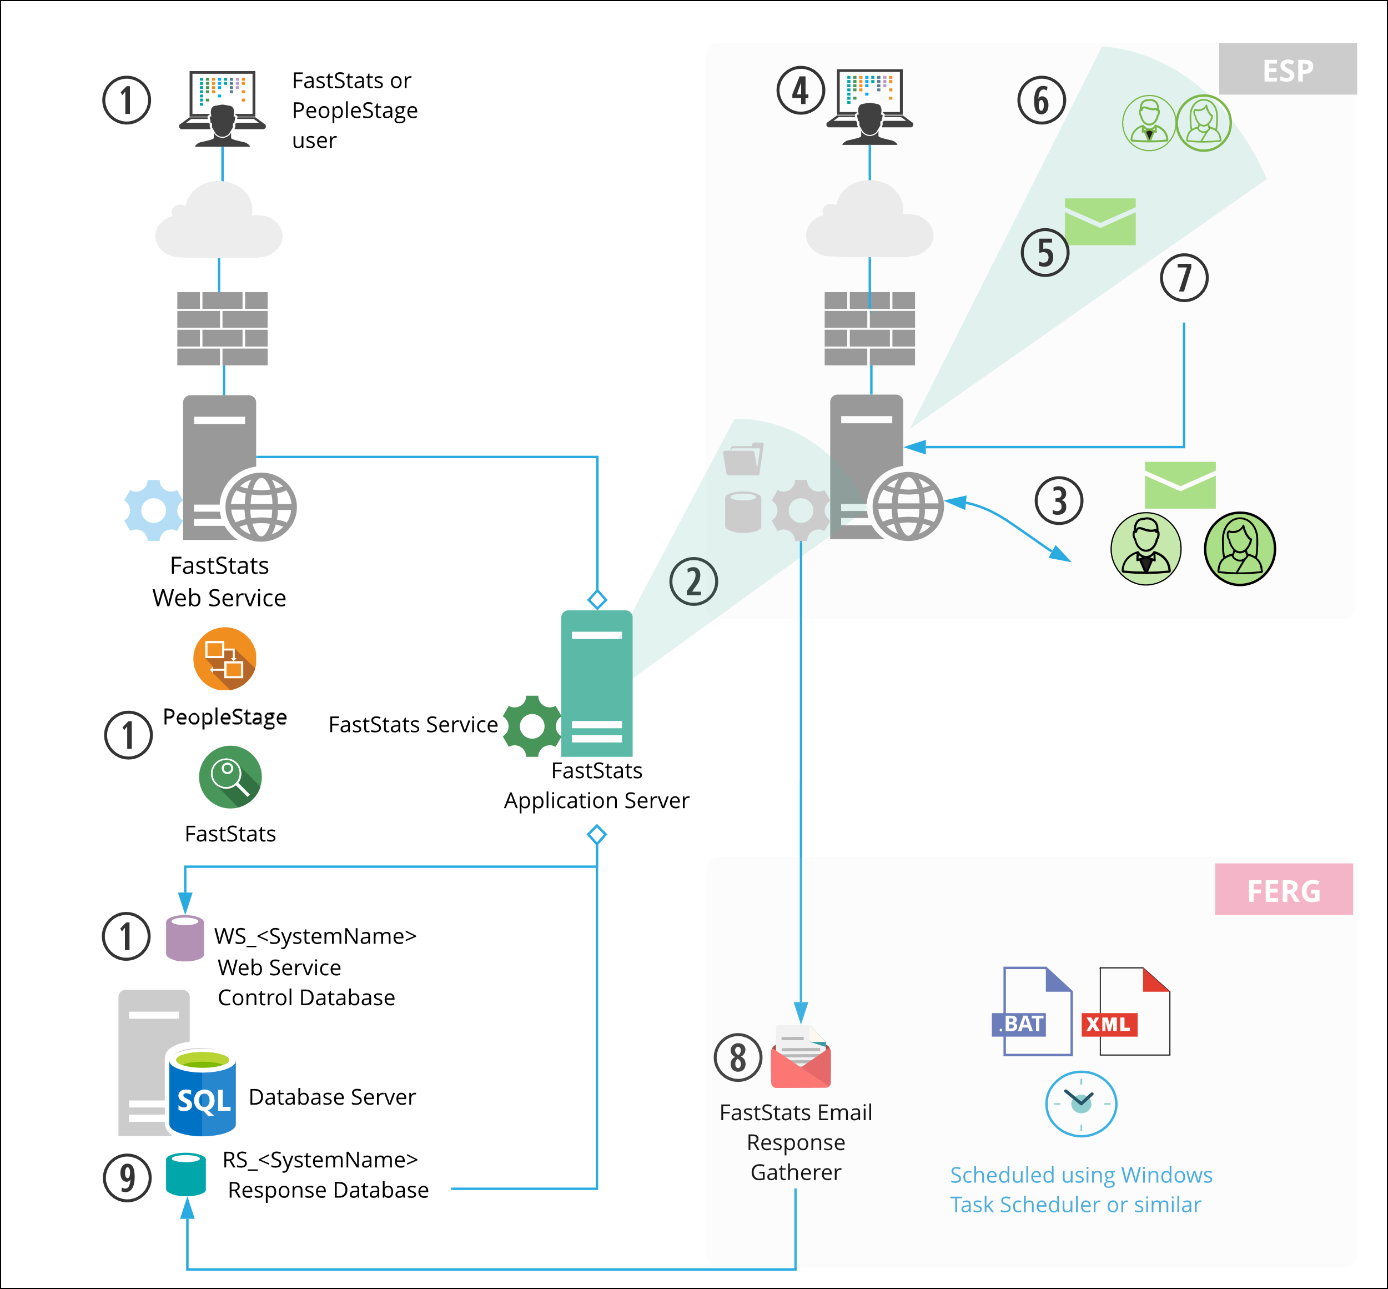
- A broadcast is initialised through the FastStats Web Service using the Email Broadcasting Wizard, which inserts a job into the Web Service Control database (WS_DB).
- The FastStats Service picks this job up, uploads the list to the Optimizely SFTP site, and then uses RESTful communication to monitor the upload.
- Optimizely then imports the contents of this list to its subscribers and associates them with a list name ready for use in any email campaigns.
- A campaign can then be scheduled using the Optimizely web interface.
- Optimizely sends messages to all recipients on the list.
- Optimizely records any undelivered messages.
- Optimizely records a response for each interaction with a message (for example opens and clicks).
- A scheduled job on the FastStats server initiates the FastStats Email Response Gatherer (FERG) which checks the SFTP site for response files.
- These responses are then imported into the Response database (RS_DB) ready for analysis by your FastStats system.
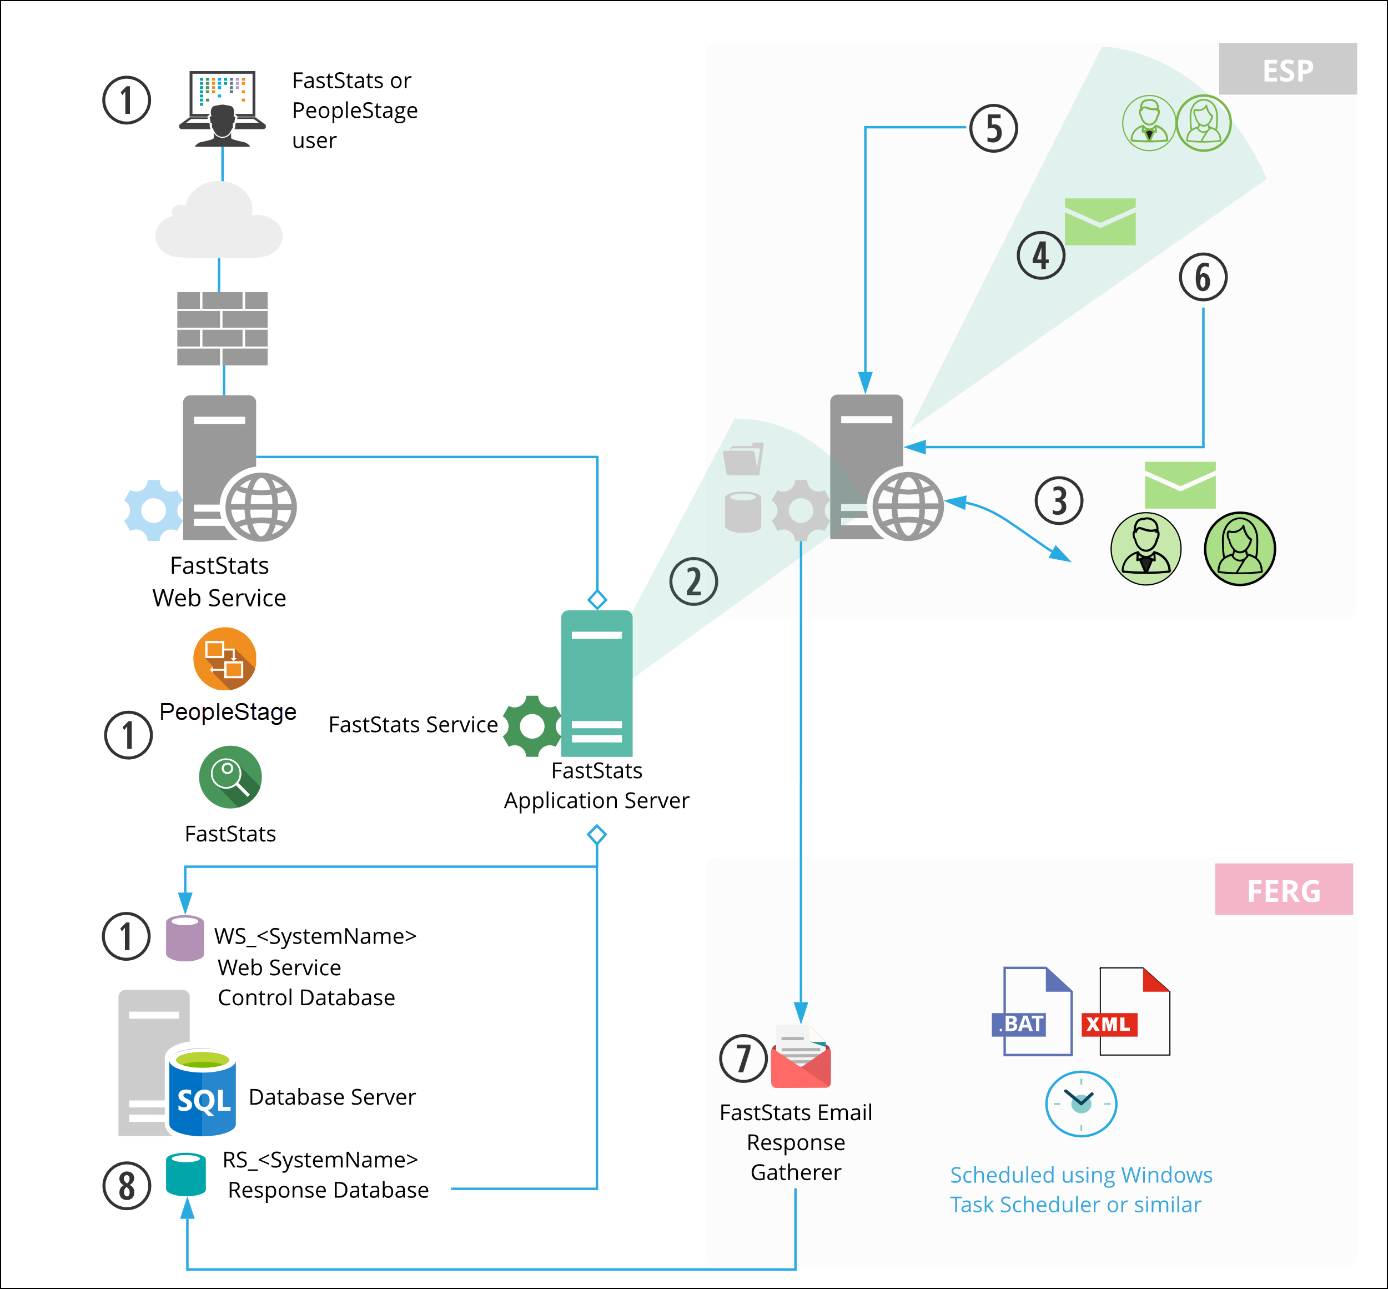
The key difference in this process is messages are sent from Optimizely automatically, allowing full control of the campaign scheduling from within Apteco software.
Note
For the message to send automatically, you need to create a Message in Optimizely.
Apteco system configuration
Creating the response database
- Open the FastStats Configurator and select Database Management.
- Select the Database Creation Wizard option and click Start Wizard.
-
Enter the name of the Database Server and click Test Connection.
Note
The Database Server name can be found by launching SSMS and finding the SQL Instance for your FastStats system, for example
TDWIN10B\SQLExpress. -
Enter a System name and your secure password.
-
Select the Email Response check box, then click Next.
Note
The Response Database may already exist—see the Notes column. If it does, click X to exit the installer without completing this process.
-
Click Next on the Review actions step, then click Run Scripts, then Finish.
Linking the response database to the FastStats service
- Open the FastStats Configurator and click FastStats Services.
- Select the FastStats Service for the system to link to the response database, then click Properties.
- Select the system tab, select Email Broadcasting from the list on the left, and enter the database connection string to your response database.
- Click Test Connection, then click OK. Select Save from the File menu.
Note
A restart of the FastStats service is required to pick up the changes. Click Restart in the Managed Services dialogue box.
For broadcasts to work correctly, ensure that the FastStats server has access to the relevant FTP site through port 443. Optimizely requires you to set up an FTP site.
Installing the email response gatherer
- Download the FastStats Email Response Gatherer installer from the DigitalIntegration.zip, available at apteco.com/portal/software-releases.
- Open the EmailResponseGatherer64Setup.msi from the
DigitalIntegration\EmailResponseGathererfolder. - Follow the installation wizard to completion. Default directory:
C:\Program Files\Apteco\FastStats Email Response Gatherer x64.
Creating the configuration file
- Browse to the directory where you installed the Email Response Gatherer and open EmailResponseConfig.exe. Enter your Connection String and click Test.
- Select Optimizely from the Broadcaster drop-down list.
- Enter the Username and Password to use with the Optimizely API.
- Use Add to add all the required parameters for the Broadcaster.
- Use the File menu to save the XML file to the batch and XML file folder.
Note
Optimizely is a Predefined Broadcaster; the only required parameter is FTPURL. You can use the other fields to customise the collection.
Scheduling the response gatherer
Set FERG to run on a scheduled basis using Windows Task Scheduler:
- Open Windows Task Scheduler and select Create Basic Task.
- Enter a Name and Description, then click Next.
- Select the Trigger interval and enter the Start Date and Time, then click Next.
- Select Start a program, click Browse, navigate to the folder containing your batch files, select the file, and click Open.
- Check the Summary, then click Finish.
FastStats broadcasting and responses
Note
You must log in as an administrator to perform the following tasks.
Enable email broadcasting
- Open the FastStats Configurator > Web Service > click OK > click Client Configuration.
- Select the Discoverer client associated with your system and click Edit.
- On the Plugins tab, ensure Apteco.Discoverer.Plugins.EmailBroadcasting is selected, then click OK.
Configuration in FastStats
- Open Apteco FastStats, select the Users explorer, right-click on the Global node then navigate to Modify > Plugin Configurations.
- Expand the Wizard node, clear the Inherit check box for Email Broadcasting (User Defined Fields), then click Edit.
-
Click Add to add a new template. Enter a Name, select the appropriate Resolve Table, and select Optimizely from the Broadcaster drop-down.
Note
The Optimizely integration name in the FastStats system is called Optivo.
Field Setting Client ID Your Optimizely Client ID URN Field Name URN Email Field Name Email Use Dated List false Template List Name *ClosedLoopWebServiceTemplate: masterUpload Only Folder %LISTNAME%Upload and Broadcast Folder %LISTNAME%\%MESSAGENAME%Use Closed Loop true Closed Loop Layout *Kunden ID\|Email\|Salutation\|Title\|Firstname\|Lastname\|mobile\|fon\|fax\|...\|Communication KeyEncoding UTF8 Note
You need to exit out of FastStats and log in again for these changes to take effect. You need to create the additional fields in the same order as the pipe-delimited text in the Closed Loop Layout.
Adding a predefined broadcasting field set
- From FastStats select Tools > Administrative Functions > Setup Broadcasting Fields.
- Click Add New Broadcasting Field and enter the Set Name to match the Template Name in Optimizely.
-
Click Add New Broadcasting Field and complete each Update Broadcasting Field dialogue until the list of broadcasting fields is complete.
Field Description Set Name Template name in Optimizely Variable Select the Variable that you wish to include in your sequence Output Style Select Code or Description Email Field Select this check-box when defining the Email field SMS Field Select this check-box when defining the SMS field Sequence ID Allows you to order your variables in the set -
At least one of the fields must be an Email Address.
Checking your configuration
- Select the Email Broadcasting icon from the Output Wizards panel.
- Select the Upload Template and click Next.
- Drag a selection from FastStats with the contact(s) you wish to send a test message to.
-
Complete the Email Broadcasting Details form and click Finish.
Field Description List Name drop-down Click the List Name retrieve button and select a list Message Name Click the Message Name retrieve button and select a message Email Address Enter an Email Address for notification once the list has been processed -
If you entered a message name, a Broadcast Warning message displays. Click Yes to commit this action.
Email responses wizard
- Open the Email Responses wizard.
- Enter the name of the message used in the Email Broadcasting wizard, then click Next.
- Check Create a virtual variable from this information if required, then click Next.
- Follow the remaining steps to store the virtual variable.
PeopleStage broadcasting and responses
Defining the broadcast channel in PeopleStage
- Open PeopleStage, select File > Administration > Channel Editor.
-
Click Add Email Channel through the context menu. Enter a Channel Name.
Field Description Broadcaster Select Optimizely from the drop-down Username Enter your API username Password Enter your API password Variable Name Select Email Address from the drop-down Variable Description Override Enter the description, for example "Email". This must correspond to the email field within Optimizely Upload but don't broadcast (Optional)—select to upload the list only Response File Key Type Should be set to Communication Key for Optimizely Message Content Type Always Broadcaster Template Field Setting Client ID Your Optimizely Client ID URN Field Name URN Email Field Name Email Use Dated List false Template List Name *ClosedLoopWebServiceTemplate: masterUpload Only Folder %LISTNAME%Upload and Broadcast Folder %LISTNAME%\%MESSAGENAME%Use Closed Loop true Closed Loop Layout *Person URN\|Email\|Salutation\|Title\|Firstname\|Lastname\|fon\|Message\|Discount\|Communication KeyEncoding UTF8 Note
You need to create the additional fields in the same order as the pipe-delimited text in the Closed Loop Layout parameter.
-
Add any additional variables on the Additional Variables tab.
- Click Save & Close.
Broadcasting in PeopleStage
- Drag your new Optimizely channel from the Library to your Delivery step.
- Select from the available messages in Optimizely from the Message Name drop-down.
- Deselect the As above check-box to use the same List Name as the Message Name.
Configuring Optimizely
If you wish to automatically broadcast the list to a message, you need to create a message within Optimizely using a Smart Campaign.
Note
This section is not intended as a full manual on setting up your messages in Optimizely. Refer to the Optimizely help or contact Optimizely for more information.
The following items are required in Optimizely:
Recipients
Create a Recipient list which includes yourself for initial testing. You can either create a recipient or Import a recipient to a list.
Smart campaign
- Create a Smart Campaign with the following minimum items: Recipients, Wait Step, and Message.
- Connect the steps.
- Recipients—select the list to use.
- Wait Step—set to Wait until import has been finished.
- Message—create an Email message and personalise.
Note
You can migrate a Classic Mailings to a Smart Campaign. The Smart Campaign needs to be Activated.
Tip
The Smart Campaign name is the Message name used in the PeopleStage Delivery.
API parameters
| Parameter | Description |
|---|---|
| FTPURL | The FTP location (including username and password) where your Optimizely responses are generated |
Email response gatherer parameters
| Parameter | Response table field | Optimizely extract file column |
|---|---|---|
| PEMPRIVATEKEY | Path and filename of a private key if secure FTP requires one | |
| FILEPATTERN | Response* | Filters your responses to specific types when reading files from the FTP site |
| EMAILCOLUMNNAME | Email address | |
| URNCOLUMNNAME | Urn | FastStats Urn |
| COMMUNICATIONKEYCOLUMNNAME | CommunicationKey | FastStats Communication Key |
| TYPECOLUMNNAME | MessageType | Response type |
| DELIVERYDATECOLUMNNAME | DeliveryDate | Delivery date |
| CLICKURLCOLUMNNAME | ClickUrl | The name of the URL that was clicked |
| CLICKDATECOLUMNNAME | ClickDate | Date the link was clicked |
| DATEFORMAT | Date format, e.g. dd.MM.yyyy HH:mm |
|
| MAXRETRIES | 1000 | Number of times to check if the extract file exists on the FTP site |
| DELIMITER | Tab | Type of delimiter used in the extract file |
| LookupBroadcastIdsOnTheFly | false | If true, Broadcast IDs are fetched and cached as needed |
| OnlyProcessRecordsWithBroadcastId | false | If true, only processes responses that originated from FastStats |
Email broadcasting parameters
| Parameter | Default | Description |
|---|---|---|
| Client ID | Your Optimizely Client ID | |
| Urn Field Name | Urn | |
| Email Field Name | ||
| UseDatedList | false | Setting to false removes the date and time stamp from the end of the file name |
| Template List Name | *ClosedLoopWebServiceTemplate: master |
|
| Upload Only Folder | %LISTNAME% |
|
| Upload and Broadcast Folder | %LISTNAME%\%MESSAGENAME% |
|
| Use Closed Loop | true | Setting to use with Smart Campaign |
| Closed Loop Layout | *Person URN\|Email\|...\|Communication Key |
|
| UploadEmptyLists | true | Set to false to prevent empty lists being uploaded |
| DatedListFormat | yyyyMMdd-HHmmss |
Date format string for the date and time stamp |
| MaxImportWaitTime | 7200 | Maximum time to wait for a list to be imported, in seconds |
| Encoding | UTF8 | Encoding of the incoming file |
| MailingListRetentionPeriod | 0 | Number of days to keep the uploaded mailing list |
Example batch file
@echo off
REM File Name: OptimizelyBatchFile.bat
D:
cd D:\FastStats\FERG
cls
SET FERG="%ProgramFiles%\Apteco\FastStats Email Response Gatherer x64\EmailResponseGatherer64.exe"
SET LOGFILE="Logs\Optimizely.txt"
SET LOGFILEDETAILS="Logs\Optimizely_Details.txt"
echo. >> %LOGFILE%
echo. >> %LOGFILEDETAILS%
echo %date% %time% - Starting FastStats Optimizely Response Download >> %LOGFILE%
echo %date% %time% - Starting FastStats Optimizely Response Download >> %LOGFILEDETAILS%
%FERG% Optimizely.xml >> %LOGFILEDETAILS%
IF ERRORLEVEL 9003 goto FailedException
IF ERRORLEVEL 9001 goto FailedDownload
IF ERRORLEVEL 9000 goto FailedLogin
:OK
echo %date% %time% - FastStats Gathered Optimizely Responses OK >> %LOGFILE%
goto Complete
:FailedLogin
echo %date% %time% - FastStats Gatherer Failed - Login Failed to Optimizely >> %LOGFILE%
goto Complete
:FailedDownload
echo %date% %time% - FastStats Gatherer Failed - Downloading from Optimizely >> %LOGFILE%
goto Complete
:FailedException
echo %date% %time% - FastStats Gatherer Failed - Optimizely API Exception >> %LOGFILE%
goto Complete
:Complete
echo %date% %time% - Completed FastStats Optimizely Response Download >> %LOGFILE%
Troubleshooting
Error received when running FERG using a batch file
Error: Could not read email response configuration file: Could not find file D:\FastStats\FERG\Optimizely.xml
Optimizely.xml refers to the filename referenced in the batch file at %FERG% Optimizely.xml. The location is set by cd D:\FastStats\FERG in the batch file.
Solution: Ensure the file exists at that path or change the filename in the batch file to match.